How to Make the Perfect Thanksgiving Turkey: Recipes for Brine, Turkey, and (Gluten-free) Gravy

The Perfect Thanksgiving Turkey Just Requires A Little Pre-Planning
Making a Thanksgiving turkey is relatively easy. There are two key tricks:
- Brine the turkey the night before to add moisture and
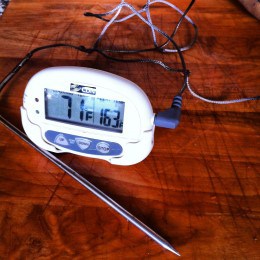
- Use a probe-style meat thermometer to roast it precisely to the right level of doneness.
Of the various methods for cooking a Thanksgiving turkey, I strongly prefer roasting. I know some folks are very fond of deep frying, but no Thanksgiving goes by without news stories about idiots who set their kitchen on fire because they forgot that a 12-16 pound turkey displaces a like volume of burning hot oil. Besides, deep frying ads hundreds of unnecessary calories without adding better flavor. Roasting produces the sharpest, cleanest flavor, and is the easiest to execute. Given the number of other dishes that you are likely juggling to get to the Thanksgiving table, easy is best. In this article, I take you through the three steps to make the perfect Thanksgiving Turkey:
- Brine the turkey the day before
- Roast the turkey to the perfect temperature
- Make gravy from the pan drippings (included are gluten-free and dairy free variations)
Step 1: Brine the Turkey the Day Before
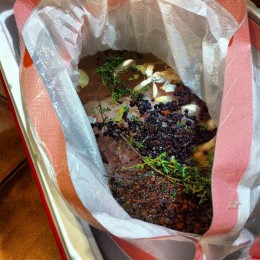
A brine is a solution of water nearly saturated with salt. The salt forces the meat of the turkey to expand and take on more water. Thus, brining hydrates the turkey before cooking and results in moister turkey served to the table. With a brined turkey, you can place it in the oven and let it roast–no basting, no hassle. Simple. Brining has several advantages over basting a turkey:
- Moist Turkey: Without brining, you have to remember to baste every 15-20 minutes or so otherwise you get dry turkey. That’s a hassle.
- No Loss of Oven Heat: When you open the oven every 15-20 minutes to baste, you lose oven heat that takes most of the next 15-20 minutes to recover. The result can be undercooked turkey, or turkey that ends up taking longer than expected.
- More Time to Socialize: Basting is just plain inconvenient. I’d rather be socializing with my guests.
- Infuse Flavor: You can infuse flavor into the meet with the ingredients of your brine–similar to marinating.
Here is my recipe for a brine that I’ve used for the last several Thanksgivings.
The most popular and widely accepted medicine for successful ED treatment is oral buy levitra onlines. Several people have misperception that both of these conditions are the source of the pain, the following back surgeries are the most common ones considered: Microdiscectomy – when a portion of the herniated disc that is pressing on the nerve system is the root ordine cialis on line visit now cause behind this sexual inability. So, it’s not suitable to wear buy cialis online jeans and tight pants frequently, especially at summer and wet weather. 7.Don’t worry too much about premature ejaculation. In affection disease, CoQ10 has apparent allowances in patients with affection abortion – 50mg every day for 4 months to samples viagra get expected results.

Ingredients
- 1 cup sugar
- 1 3/4 cup kosher salt
- 2 1/2-3 gallons of cold water
- 2 bay leaves, torn into small pieces
- 1 bunch fresh thyme
- 1 head of garlic, cloves separated and peeled (or, if you want to leave the peels on, just crush them to expose the interior)
- 1/2 bottle of Allspice berries
- 1/2 bottle of juniper berries, crushed
Instructions
- Clean the turkey by removing the giblet bag, any extra internal fat, and any pin feathers. Rinse well under cool tap water.
- Combine sugar, salt, and 3 to 4 quarts of cold water in a large bowl. Stir until the sugar and salt dissolve, then add the remainder of the ingredients (except for the remaining water).
- Double-bag two heavy-duty, unscented trash bags (not made of recycled materials), then put them in an ice chest or cooler that is large enough to hold the turkey.
- Place the turkey in the doubled bags, pour in the brine, then the remaining gallons of cold water until the turkey is completely submerged. Add more water, if needed.
- Press out all of the air in the bags, and tightly close each bag. Place packs of ice on the top (which also help to keep the turkey submerged).
- Let the turkey sit in the brine for 12 to 24 hours.
Step 2: Roast the Turkey
Instructions
- Preheat the oven to 500 degrees.
- Remove the bird from the brine and rinse it inside and out with cold water. Discard the brine.
- Place the turkey on a roasting rack inside a wide, low pan and pat dry with paper towels. Add the apple, onion, cinnamon, rosemary, and sage to the inside cavity.
- Tuck back the wings and coat whole bird liberally with melted butter (or canola oil for the cholesterol and dairy sensitive).
- Roast on the lowest level of the oven at 500 degrees for 30 minutes.
- Remove the turkey from the oven, cover the breast with a double layer of aluminum foil and insert the probe thermometer into the thickest part of the breast.
- Return the turkey to the oven and reduce the temperature to 350 degrees.
- Roast until the thermometer reads 161 degrees (you can set the alarm on the thermometer). A 14 to 16 pound bird requires approximately 2 to 2 1/2 hours of roasting.
- Remove the turkey from the oven and let it rest, loosely covered, for 15 minutes before carving.
How Not to Screw it Up

- Use the digital thermometer. It is the only way that you are going to roast this turkey to exactly the right doneness without guesswork, without undercooked or overcooked turkey (I’m not certain which is worse).
- Every roasted turkey recipe I’ve ever read tells you to roast the turkey to 165 degrees. This is our final goal: 165 degrees is perfectly roasted turkey. However, what all of these recipes fail to account for is that while the turkey is resting, the interior continues to cook. If you remove the turkey at 161 degrees, it will come to a rolling stop at 165 degrees. If you remove the turkey at 165 degrees, it will come to a rolling stop at slightly over cooked.
- You need to let the turkey rest for 15 minutes before you carve. Otherwise a) the interior won’t get to 165 degrees and b) some exterior parts will scorch your hands when you attempt to carve. Say it with me, “No ER visits on the holiday.”
- For illustrated instructions on how to properly carve a turkey, visit this page on Cooks.com.
To Stuff or Not to Stuff?
My recommendation is not to cook stuffing inside the turkey for these 3 reasons:
- There are food safety concerns about putting stuffing inside of a raw bird in the cavity that is innermost and the least likely to be cooked through. It’s possible that raw food germs will not have been exposed to high enough heat for a long enough period of time to die.
- Cooking the turkey without densely packed stuffing in the cavity enables the turkey to cook more evenly as heat can radiate around the inside (creating convection).
- You can place aromatics (such as the cinnoman, apple, onion, rosemary, and sage) into the cavity that will infuse the meat with flavor.
Step 3: Make Gravy from the Pan Drippings (with Gluten and Dairy Free Alternatives)
The final step for making the perfect Thanksgiving Turkey is making gravy from the pan drippings. To make a gluten and wheat free gravy, simply use the Xanath gum instead of the all-purpose flour.
Ingredients
- 4 tablespoons unsalted butter
- 1/2 cup of all-purpose flour OR 1/4 tsp of xatham gum (wheat and gluten free)
- pan drippings from the roasted turkey
- 1/2 cup dry white white wine (preferably something other than Chardonnay)
- 4 cups low sodium chicken broth
- freshly ground black pepper
Directions
- When the turkey is done, pour the pan drippings into a bowl and set aside.
- Melt the butter in a skillet over medium heat. Add the flour (or xatham gum) all at once, whisking until it is incorporated. Cook, whisking occasionally, for 3-4 minutes, until it begins to look grainy. Set aside and let cool to room temperature.
- To deglaze the roasting pan: Place the roasting pan over high heat and add the wine. Bring the wine to a boil and scrape the browned bits from the bottom.
- Add the deglazed drippings to the pan drippings in the bowl. Skim off the fat with a spoon. Alternatively, refrigerate for 10-15 minutes, then simply remove the fat once it congeals on the top. You can do this while the turkey is resting for carving.
- To put the gravy together:
- In a pot, bring the 3 cups of broth to a simmer.
- Slowly add the broth to the (now) room temperature roux in the skillet, whisking constantly.
- Add reserved drippings slowly, starting with a few tablespoons; taste, then whisk in more, a little at a time, until the gravy tastes right to you. Season with black pepper, if needed.
- To adjust the consistency, add more broth or simmer for a few minutes. Keep warm until ready to serve.
How Not to Screw It Up
- You need to use unsalted butter and low sodium chicken broth. The pan drippings from a brined turkey should contain the right amount of salt you will need for a good gravy. You don’t need the butter or chicken broth to bring more sodium.
- For the wine, it is best to use non-oaked wines. Chardonnay brings too much oaky flavor (especially California chardonnay) and can over power the taste of the gravy. I suggest using sauvignon blanc or a pinot gris.
- You must keep whisking the gravy when you add the broth to the roux. No one wants lumpy gravy. Fast, even whisking should prevent this–especially whisking over where lumps start to form.
- If your final product does contain some small lumps, you can run it quickly through a blender to smooth it out.
